


bensuslu11
-
Posts
1103 -
Joined
-
Last visited
-
Days Won
52
Content Type
Profiles
Forums
Calendar
Posts posted by bensuslu11
-
-
ekvatorx33, 8 dakika önce yazdı:
oyunlar için ekstra performans ayarları yapıldımı acaba
Evet
-
WINDOWS 8.1 with UPDATE ESDs
9600.17053.winblue_refresh.141120-0031 / IR5
represent November 2014 Refresh release (which matches current MSDN ISO releases), and have these integrated updates:Code:KB2919355 (Windows 8.1 Update) KB3000850 (November 2014 Rollup) KB2975061, KB2920189, KB2931358, KB2931366, KB2932046, KB2934018 KB2937220, KB2937592, KB2938439, KB2938772, KB2939153, KB2949621 KB2954879, KB2958262, KB2958263, KB2961072, KB2962140, KB2965142 KB2965500, KB2966407, KB2967917, KB2968599, KB2971203, KB2973351 KB2976627, KB2976978, KB2977629, KB2978002, KB2978742, KB2981580 KB2987107, KB2989647, KB2998527, KB3001237, KB3003057, KB3014442 Embedded Lockdown Manager KB2959936
9600.17053.winblue_refresh.140923-1144 / IR4
represent August 2014 Refresh release, and have these integrated updates:Code:KB2919355 (Windows 8.1 Update) KB2975061, KB2975719, KB2920189, KB2931358, KB2931366 KB2932046, KB2934018, KB2937220, KB2937592, KB2938439, KB2938772 KB2939153, KB2939576, KB2949621, KB2950153, KB2954879, KB2955164 KB2956575, KB2958262, KB2958263, KB2959626, KB2961072, KB2962140 KB2962872, KB2964718, KB2965142, KB2966407, KB2966870, KB2967162 KB2968599, KB2969817, KB2971203, KB2971850, KB2972280, KB2973201 KB2974008, KB2976978, KB2979582, KB2980654, KB2990532, KB2993651 Embedded Lockdown Manager KB2959936
9600.17050.winblue_refresh.140317-1640 / IR3
represent April 2014 Refresh release, and have these integrated updates:Code:KB2919355 (Windows 8.1 Update) KB2919442, KB2932046, KB2937220, KB2937592,KB2938439, KB2938772, KB2939471, KB2949621
9600.17053.141120-0031.winblue_refresh / IR5
Windows 8.1 (Core)
Windows 8.1 N (CoreN)
Windows 8.1 China (CoreCountrySpecific)
Windows 8.1 Single Language (CoreSingleLanguage)
Windows 8.1 Pro (Professional)
Windows 8.1 Pro N (ProfessionalN)
Windows 8.1 Pro with Media Center (ProfessionalWMC)
Windows 8.1 RT (ARM) veya
9600.17053.140923-1144.winblue_refresh / IR4SPOILERWindows 8.1 (Core)
Windows 8.1 N (CoreN)
Windows 8.1 China (CoreCountrySpecific)
Windows 8.1 Single Language (CoreSingleLanguage)
Windows 8.1 Pro (Professional)
Windows 8.1 Pro N (ProfessionalN)
Windows 8.1 Pro with Media Center (ProfessionalWMC)
9600.17050.140317-1640.winblue_refresh / IR3SPOILERWindows 8.1 / Windows 8.1 N / Windows 8.1 Pro / Windows 8.1 Pro N
Windows 8.1 Single Language
Windows 8.1 Pro with Media Center
Windows 8.1 China / x64 onlyDownload the decryption package, and Extract its contents to a folder with simple path (example: C:\ESD).2. Copy or Move the choosen ESD file to the same folder. Make sure that the ESD file is not read-only or blocked:Code:File: esd-decrypter-wimlib-8.7z MD5: f8cb9346e866348e8cb104b824726ee7 SHA1: eed81e3ea7e5a649996c584d62d25ebd1e1dfa59 https://github.com/abbodi1406/WHD/raw/master/scripts/esd-decrypter-wimlib-8.7z Mirrors
![[IMG]](https://www.tnctr.com/applications/core/interface/js/spacer.png)
3. You have two ways to start the process:
a) Directly, right click on decrypt.cmd and 'Run as administrator'
this require only 1 ESD file present in the current directory.
b) Open admin Command Prompt in or to the same current directory, and Execute: decrypt ESDfilename.esd
example:this method allow the present of several ESD files in the current directory, or to use ESD from another location.Code:decrypt x86fre_coresinglelanguage_en-us.esd
4. If all goes well, you will get these options:
1 - Create Full ISO with Standard install.wim
this is the most preferable option, which will convert ESD file to a regular ISO distribution that contains standard install.wim file
2 - Create Full ISO with Compressed install.esd
this is similar to the first, but it will use and contain highly compressed install.esd file
3 - Create Standard install.wim
this will create a single install.wim file, which you can use with any ISO you already have for the same product and same version
or to use it for manual apply using dism/wimlib/imagex
4 - Create Compressed install.esd
this is similar to the third, but it will create install.esd file, which can be used just like install.wim -
Windows 10
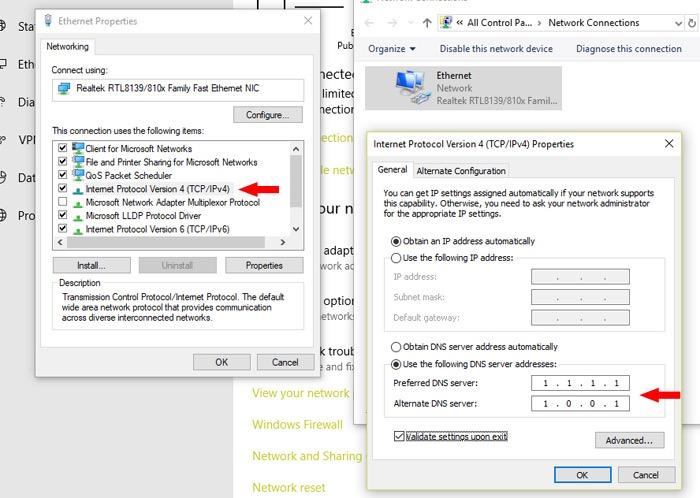
Not: linkleri açmak için dns değiştirmeniz gerekiyor. Pastebin sitesinin ülkemizde engeli var. Dns olarak 1.1.1.1 girebilirsiniz
-
Version 22H2
19045.2486.230107-0437.22h2_release_svc_refresh / Include EP KB5015684, SSU-19041.2300, LCU KB5022282
19045.2006.220908-0225.22h2_release_svc_refresh / Include EP KB5015684, SSU-19041.1940, LCU KB5017308
WSUS links
19045.1826.220707-2303.22h2_release_svc_refresh / Include EP KB5015684, SSU-19041.1790, LCU KB5015807 -
Version 21H2
19044.1706.220505-0136.21h2_release_svc_refresh / Include EP KB5003791, SSU-19041.1704, LCU KB5013942
19044.1586.220303-0721.21h2_release_svc_refresh / Include EP KB5003791, SSU-19041.1525, LCU KB5011487
19044.1288.211006-0501.21h2_release_svc_refresh / Include EP KB5003791, SSU-19041.1220, LCU KB5006670
WSUS links
19044.1165.210806-1742.21h2_release_svc_refresh / Include EP KB5003791, SSU-19041.1145, LCU KB5005033 - Version 21H1
-
19043.1706.220505-1151.21h1_release_svc_refresh / Include EP KB5000736, SSU-19041.1704, LCU KB5013942
19043.1348.211103-2252.21h1_release_svc_refresh / Include EP KB5000736, SSU-19041.1310, LCU KB5007186
19043.1288.211006-0459.21h1_release_svc_refresh / Include EP KB5000736, SSU-19041.1220, LCU KB5006670
19043.928.210409-1212.21h1_release_svc_refresh / Include EP KB5000736, SSU-19041.925, LCU KB5001330
19043.867.210305-1751.21h1_release_svc_refresh / Include EP KB5000736, SSU-19041.860, LCU KB5000802 -
Version 20H2
19042.1706.220513-0540.20h2_release_svc_refresh / Include EP KB4562830, SSU-19041.1704, LCU KB5013942
19042.1348.211103-2005.20h2_release_svc_refresh / Include EP KB4562830, SSU-19041.1310, LCU KB5007186
19042.1052.210606-1844.20h2_release_svc_refresh / Include EP KB4562830, SSU-19041.1022, LCU KB5003637
19042.631.201119-0144.20h2_release_svc_refresh / Include EP KB4562830, SSU KB4586864, LCU KB4594440
WSUS links
19042.630.201106-1636.20h2_release_svc_refresh / Include EP KB4562830, SSU KB4586864, LCU KB4586781
19042.572.201009-1947.20h2_release_svc_refresh / Include EP KB4562830, SSU KB4577266, LCU KB4579311
19042.572.201012-1221.20h2_release_svc_refresh / Windows 10 Team (PPIPro)
19042.508.200927-1902.20h2_release_svc_refresh / Include EP KB4562830, SSU KB4577266, LCU KB4571756
19042.450.200814-0345.20h2_release_svc_refresh / Include EP KB4562830, SSU KB4570334, LCU KB4566782 -
Version 2004
19041.572.201009-1946.vb_release_svc_refresh / Include KB4579311, KB4577266
19041.508.200907-0256.vb_release_svc_refresh / Include KB4571756, KB4577266
19041.450.200808-0726.vb_release_svc_refresh / Include KB4570334, KB4566782
19041.388.200710-1729.vb_release_svc_refresh / Include KB4565503, KB4566785
19041.264.200511-0456.vb_release_svc_refresh / Include KB4556803, KB4557968
19041.84.200218-1143.vb_release_svc_refresh / Include KB4539080, KB4534170 -
Version 1909
18363.1139.201008-0514.19h2_release_svc_refresh / Include KB4577670, KB4577671, KB4517245
18363.592.200109-2016.19h2_release_svc_refresh / Include KB4528760, KB4528759, KB4517245
18363.418.191007-0143.19h2_release_svc_refresh / Include KB4517389, KB4521863, KB4517245
18363.356.190918-2052.19h2_release_svc_refresh / Include KB4515384, KB4515383, KB4517245 -
Version 1903
18362.356.190909-1636.19h1_release_svc_refresh / Include KB4515384, KB4515383
18362.295.190809-2228.19h1_release_svc_refresh / Include KB4512508, KB4508433
18362.239.190709-0052.19h1_release_svc_refresh / Include KB4507453, KB4509096
18362.175.190612-0046.19h1_release_svc_refresh / Include KB4503293, KB4498523
18362.30.190401-1528.19h1_release_svc_refresh / Include KB4497464, KB4497727 -
Version 1809
17763.379.190312-0539.rs5_release_svc_refresh / Include KB4489899, KB4470788, KB4489907, KB4483452
17763.253.190108-0006.rs5_release_svc_refresh / Include KB4480116, KB4470788, KB4470502
17763.107.101029-1455.rs5_release_svc_refresh / Include KB4464455
17763.1.180914-1434.rs5_release -
Version 1803
-
Version 1709
16299.125.171213-1220.rs3_release_svc_refresh / Include KB4054517, KB4053577
(Enterprise VL, Education VL, Pro VL)
(Windows 10 S, Education, Pro, Home, Home Single Language, Home China) Retail
16299.15.171109-1522.rs3_release_svc_refresh / Include KB4048955, KB4048951
(Windows 10 S, Education, Pro, Home, Home Single Language, Home China) Retail
16299.15.170928-1534.rs3_release
(Enterprise VL, Education VL, Pro VL)
(Windows 10 S, Education, Pro, Home, Home Single Language, Home China) Retail -
Version 1703
15063.0.170710-1358.rs2_release_svc_refresh / Include KB4022405, KB4025342, KB4025376
(Enterprise VL, Education VL, Pro VL, Pro Retail, PPIPro)
(Windows 10 S, Education, Pro, Home, Home Single Language, Home China) Retail
15063.0.170607-1447.rs2_release_svc_refresh / Include KB4022405, KB4022725, KB4022730
(Education, Pro, Home, Home Single Language, Home China) Retail
15063.0.170317-1834.rs2_release
(Enterprise VL, Education VL, Pro VL, Pro Retail)
(Education, Pro, Home, Home Single Language, Home China) Retail
(PPIPro = SurfaceHub) -
Version 1607
14393.0.161119-1705.rs1_refresh / Include KB3199986, KB3200970
(Enterprise VL, Education VL, Pro VL, Pro Retail)
(Education, Pro, Home, Home Single Language, Home China) Retail
(PPIPro = SurfaceHub)
14393.0.160715-1616.rs1_release
(Enterprise VL, Education VL, Pro VL, Pro Retail)
(Education, Pro, Home, Home Single Language, Home China) Retail -
Version 1511
10586.0.160426-1409.th2_refresh / Include KB3140768, KB3139907
(Enterprise VL, Education VL, Pro VL, Pro Retail)
(Education, Pro/Home, Home Single Language, Home China) Retail
10586.0.160212-2000.th2_refresh / Include KB3135173, KB3136561
(Enterprise VL, Education VL, Pro VL, Pro Retail)
Education, Pro/Home, Home Single Language, Home China) Retail
10586.0.151029-1700.th2_release
(Enterprise VL, Education VL, Pro VL, Pro Retail)
(Education, Pro/Home, Home Single Language, Home China) Retail -
Version 1507
10240.16393.150909-1450.th1_refresh / Include KB3081452, KB3081455
10240.16384.150709-1700.th1_release - Decryption/Convertion Script
- File: esd-decrypter-wimlib-63.7z SHA-1: 304c74baccd85ba5ee66cf709fd77b3f71908217 SHA-256: 48e8044789a0e51eb78561a2f25b1764bda401e8f70ce8f3222fcb31e011e411 https://github.com/abbodi1406/WHD/raw/master/scripts/esd-decrypter-wimlib-63.7z
- https://host-a.net/f/310181-esd-decrypter-wimlib-637z
- https://download.ru/files/KmVwmVC4
-
 3
3
-
zafer3355, 2 saat önce yazdı:
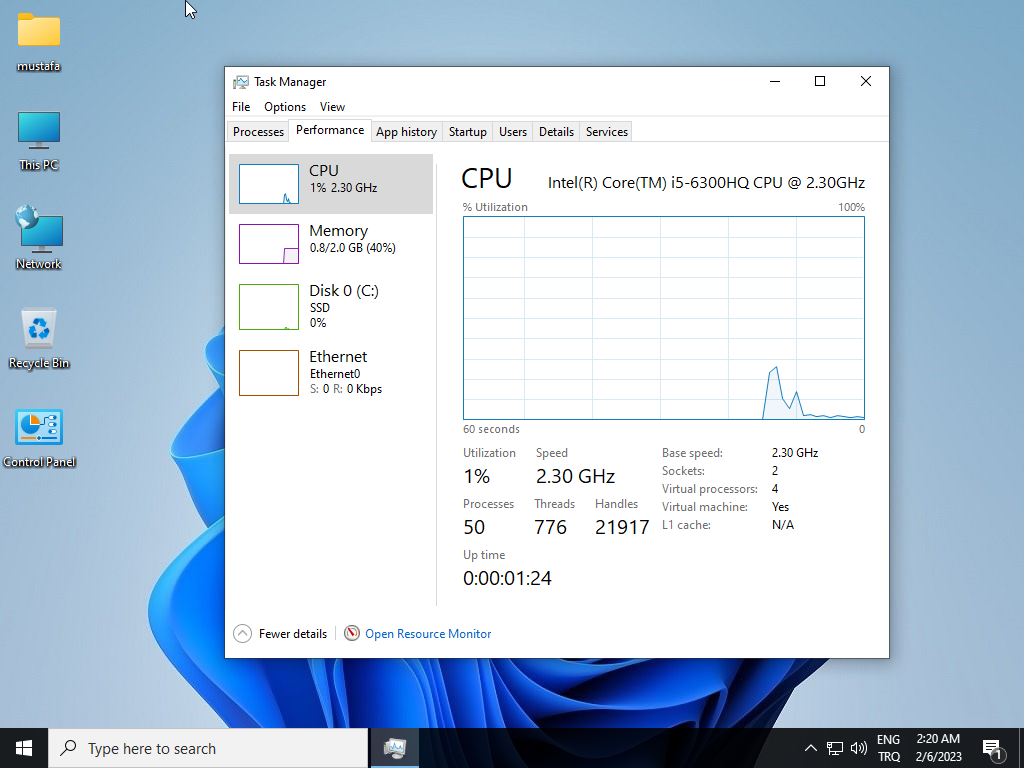
Extreme içeriğinde de defender mevcut mu? Ayrıca defender var iken nasıl ram kullanımını bu kadar düşük yaptın merak ettim
Her iki versiyondada defender yok. Resimdeki core versiyonununa ait görüntü
-
2
-
-
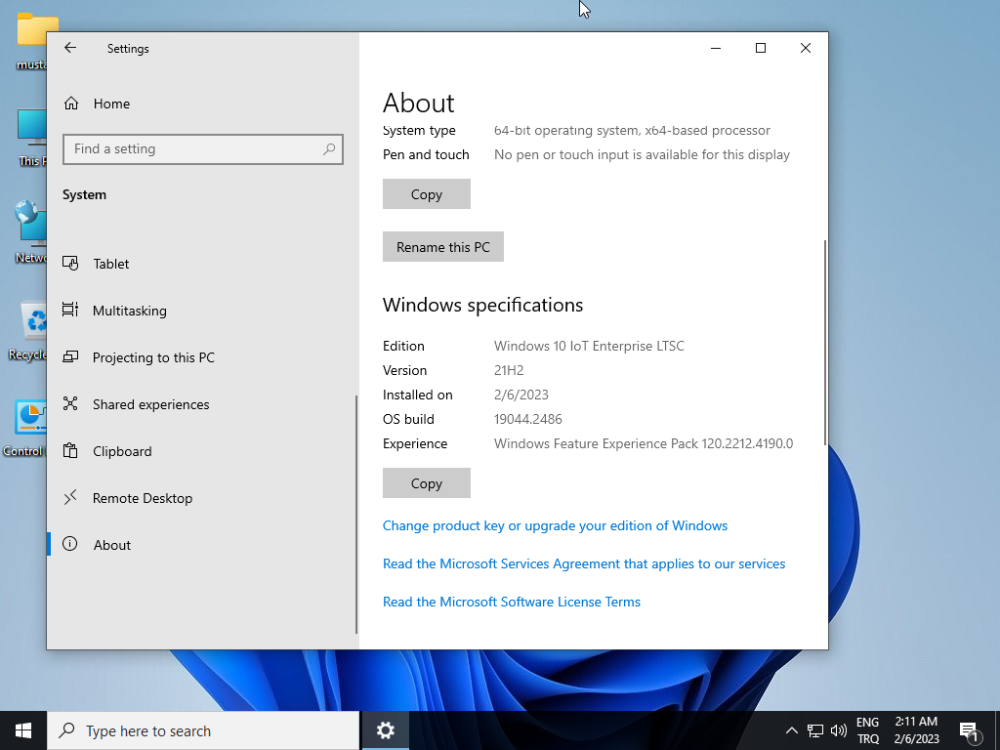
Windows 10 Iot Enterprise LTSC X64 [ Lite-Extreme ]Turkish & English
İMAJ İÇERİSİNDE İKİ FARKLI İMAJ KALIBI VARDIR
TÜRKÇE VE İNGİLİZCE DİL PAKETLERİ SİSTEME ENTEGRE EDİLMİŞTİR.
EXTREME VE CORE OLMAK ÜZERE İMAJLAR ADLANDIRILMIŞTIR.
CORE VERSİYONU HER KULLANICIYA HİTAP EDERKEN EXTREME VERSİYONU LİTE TADINDA BİR SİSTEMDİR.
SİSTEME WİNDOWS 11 İCONLARI VE DUVARKAĞITLARI ENTEGRE EDİLMİŞTİR.
OTOMATİK DİGİTAL LİSANS İLE AKTİVE OLUR. HERHANGİ BİR AKTİVASYON ARACI KULLANMANIZA GEREK YOKTUR.
CORE SÜRÜMDE YAPILANLAR
İSODAN ELLE YÜKSELTME DOSYALARI SİLİNDİ /DEFENDER ANTİVİRÜS KALDIRILDI/ EDGE KALDIRILDI / NETFRAMEWORK 3,5 ETKİN / WİNDOWS RECOVERY (WİNRE.WİM) BULUNMAZ, / DEFENDER AKTİF / ESKİ BİLEŞENLER AKTİF / MASAÜSTÜ SİMGELER AKTİF / WİNDOWS FOTOĞRAF GÖRÜNTÜLEYİCİ EKLENDİ / UAC KAPATILDI / WİNDOWS SEARCH DEVREDIŞI / ONEDRİVE DEVREDIŞI / CORTANA DEVREDIŞI / SİSTEM TEMİZLİĞİ YAPILDI / GEREKSİZ SERVİSLER KAPATILDI / SANAL BELLEK DOSYALARI KAPATILDI / UYKU MODU HAZIRDA BEKLETME DOSYALARI KAPATILDI
EXTREME SÜRÜMDE YAPILANLAR
EXTREM AYARLAR YAPILDI.
İNDİRME LİNKLERİ YAKINDA PAYLAŞILACAKTIR
indir: ESD SÜRÜM https://www.mediafire.com/file/q6snkvcspkznhow/W10_LTSC_2021_X64_ESD_TR_US.iso/file
telif hakkı nedeniyle link engellenmiştir. Tekrar upload edilecektir.
ilginiz için teşekkür ederim ☺️ 3.17 GBWİM SÜRÜM 4.17 GB
-
5
-
 1
1
-
-
kerem2018, 3 saat önce yazdı:
Eliniz e emeğinize sağlık hocam. Yine harika bir çalışma daha. En seri ve akıcı çalışan CoreSingleLanguage mi ?
Ben lot enterprise tavsiye ederim
-
Korkmazeli, 9 saat önce yazdı:
Microsoft Office 2021 Pro Plus Key
DRK3N-824V4-GJFG7-RYC4T-BP4Y9
5921680 9369223 6414570 7961354 5145272 9633096 9502274 1186666 6051360Rica etsem yardımcı olurmusunuz
cmd yönetici olarak aç aşağıdaki komutları yapıştır
if exist "%ProgramFiles%\Microsoft Office\Office16\ospp.vbs" (cd /d "%ProgramFiles%\Microsoft Office\Office16")
if exist "%ProgramFiles(x86)%\Microsoft Office\Office16\ospp.vbs" (cd /d "%ProgramFiles(x86)%\Microsoft Office\Office16")
set CID=454085045710226406456513212615520024624161350962
cscript //nologo OSPP.VBS /actcid:%CID%
cscript.exe OSPP.vbs /act
for /f "tokens=2,3,4,5,6 usebackq delims=:/ " %%a in ('%date% %time%') do echo %%c-%%a-%%b %%d%%e
echo DATE: %date% >status.txt
echo TIME: %time% >>status.txt
for /f "tokens=8" %b in ('cscript ospp.vbs /dinstid ^| findstr /b /c:"Installation ID"') do set IID=%b
echo IID: %IID%>>status.txt
echo CID: 454085045710226406456513212615520024624161350962>>status.txt
cscript ospp.vbs /dstatus >>status.txt
start status.txt
bensuslu11, 1 dakika önce yazdı:if exist "%ProgramFiles%\Microsoft Office\Office16\ospp.vbs" (cd /d "%ProgramFiles%\Microsoft Office\Office16")
if exist "%ProgramFiles(x86)%\Microsoft Office\Office16\ospp.vbs" (cd /d "%ProgramFiles(x86)%\Microsoft Office\Office16")
set CID=454085045710226406456513212615520024624161350962
cscript //nologo OSPP.VBS /actcid:%CID%
cscript.exe OSPP.vbs /act
for /f "tokens=2,3,4,5,6 usebackq delims=:/ " %%a in ('%date% %time%') do echo %%c-%%a-%%b %%d%%e
echo DATE: %date% >status.txt
echo TIME: %time% >>status.txt
for /f "tokens=8" %b in ('cscript ospp.vbs /dinstid ^| findstr /b /c:"Installation ID"') do set IID=%b
echo IID: %IID%>>status.txt
echo CID: 454085045710226406456513212615520024624161350962>>status.txt
cscript ospp.vbs /dstatus >>status.txt
start status.txt
cmd yönetici olarak aç yukarıdaki komutları yapıştır
-
TR_by, 1 saat önce yazdı:
Yanlış, Ltsc ile karıştırıyorsun.
Var var, ben uzun zamandır kullanıyorum
https://learn.microsoft.com/en-us/windows/iot/product-family/what's-new-in-windows-11-iot-enterprise
-
1
-
-
bilalozkan7, 6 saat önce yazdı:
Öncelikle elinize sağlık. Başka bir siteden buna benzer bir çalışma indirdim. Ancak yapımcısı yabancı. O indirdiğim çalışmada her ne kadar Türkçe dilinde kursam da sistem içerisinde bazı yerler İngilizce kaldı. Yani anladığım kadarıyla ana sistem dosyaları İngilizce üzerine kurulmuş bir çalışmaydı. O nedenle o ISO yu artık kullanamıyorum. Sizin çalışmada da aynı durum geçerli mi? Yani Türkçe dilinde kurulum yapınca istisnasız her yer Türkçe kalıyor mu?
Evet. Tamamen her yer türkçe
-
Dosyalar erişime kapalı
-
-
- Popular Post
Win11-22H2-ESD_amd64-5in1_TPM_Fixed_Multilanguage VERSİON 22621.1194
----------------------------
Sistem içerisine eklenen diller
----------------------------
en-gb
ar-sa
bg-bg
ca-es
el-gr
es-es
eu-es
fr-fr
gl-es
he-il
hr-hr
pt-pt
ro-ro
ru-ru
sl-si
sr-latn-rs
tr-tr
uk-uaHazırlamış olduğum imaj içerisinde 5 windows sürümü bulunmaktadır.
Core Single Language Edition - Home Edition- Professional Edition - Professional Education Edition - IotEnterprise Edition
Yapılan çalışmalar şunlardır
1- Net Framework 3.5 aktif edilmiştir.
2- Windows Defender , Cortana ve bazı Windows Mağaza uygulamaları kaldırıldı.
3- TPM, RAM vb gibi kurulumu engelleyen sorunlar giderildi.
4- Local kullanıcı ile kurulum yapılmaktadır. Online hesap ile giriş yapmaya gerek yoktur.
5- Herhangi bir aktivasyon aracı gerekmez. Otomatik digital lisans ile aktivasyon gerçekleşir.
6- Ventoy ile uyumludur.
indirme Linkleri:
https://www.mediafire.com/file/1dafipn840ciaaa/Win11-22H2-ESD_amd64-5in1_TPM_Fixed.iso/file (⚡Tnc Debrid ile İndir) 5.27 GB
-
8
-
4
-
tpm ram cpu atlatma , local kullanıcı kurulumu ve hwid aktivasyon için %oem% aracı
iso kalıbının içinde sources klasörüne atmalısınız.
-
3
-
-
elifbeyza7, Şimdi yazdı:
teşekkur ederim yardımlarınızdan dolayı bensuslu11
Rica ederim. Takıldığınız bir konu olursa özelden yazabilirsiniz. Yardımcı olurum
-
1
-
-
Kesinlikle. Eğer istersen bu linkten orjinal Windows kurulum indirebilirsin. 32 gb usb bellek gerekiyor
https://pcsupport.lenovo.com/be/tr/lenovorecovery
elifbeyza7, 6 dakika önce yazdı:benim normal lonovo laptop hocam amd mı kurmak gerekiyor
-
buradan bios dosyasını indirim ve kurun. Ardından lenovo orjinal windows imajını indirmelisin.
https://pcsupport.lenovo.com/be/tr/products/laptops-and-netbooks/100-series/110-15acl/solutions/ht103653bu linkten usb recovery imajı oluştur. En az 32 gb usb bellek gerekiyor
-
Amd olanı kurmalısın muhtemelen. Genelde tablet tarzı laptoplarda arm kullanılır. Dokunmatik ve işlemci değeri düşük olanlar arm kullanır
elifbeyza7, 22 dakika önce yazdı:HOCAM bir sorum olcak win 11 arm amd var bu ne oluyor benim bilgisayar intel i5 mesela
-
akura, 5 dakika önce yazdı:
merhaba yardımcı olursanız çok memnun olurum.
5108524
2387671
2270271
8179640
9261854
9201523
3127320
9784745
4466161
Kullandığın ürün anahtarı engellenmiş. Malesefaktivasyon olmaz. Başka bir ürün anahtarı eklemelisin
-
turknet33, 4 saat önce yazdı:
ustam portable klazım botaple değil windowsta masaüstünde çalışan sistem botable ben kendim yapıyorum var
Bu link bootable değil, https://drive.google.com/file/d/14bd7yYXeuoCpyAfapX4E_9x3zOGO5UZf/view?usp=drivesdk
-
Version2020
https://uploadrar.com/0ril642hjx78
version 2021
https://drive.google.com/file/d/14bd7yYXeuoCpyAfapX4E_9x3zOGO5UZf/view?usp=drivesdk
bootable version
https://drive.google.com/file/d/1BKb7fuJdX9bMjAx2jdhYe0VlsujYjWh9/view?usp=drivesdk
RAR Şifresi: fullindir.cafe
-
deli_petro06, 5 saat önce yazdı:
Daha önce bir builder paylaşmıştım. Belirttiğin uygulamalar katılımsızsa basit bir şekilde ilk açılışta kurulum yaptırabiliyorsun. Şu an o builder' ın yapımcısı Hüseyin Uzunyayla daha gelişmiş bir versiyonunu hazırlıyor. Bildiğim kadarıyla bu işlemi bir bat dosyası oluşturup tek bir kez başlangıçta çalışacak şekilde hazırlandığında chocolatey v.b. siteler üzerinden de kurulabiliyor. Elimde katılımsız kurulum dosyaları var dersen (bir kaç yer de online kurulumlar içinde katılımsız dosyası görmüştüm) basit bir şekilde komut dosyasını daha önce eklediğim konudaki builder ile iso içerisine entegre edip kurulum yaptırabilirsin. Bu konu da @OgnitorenKshocam daha pratik bir çözüm önerebilir diye düşünüyorum...
Batch dosyası oluşturup bunları seçmeli olarak kurdurabiliyorsun. Chocolatey sitesine baktım. Google Chrome, Adobe Reader v.s. gibi uygulamalar var. Batch dosyası konusunda @Ognitorenks yani Hüseyin Uzunyayla hocam ciddi anlam da bilgili ve deneyimlidir...
@KiNGHaZe hocamında daha önce ofis uygulamaları için çevrimiçi kurulum yapan paylaşımlarını görmüştüm. Bir şekilde yardımcı olabileceğini düşünüyorum...
https://discord.gg/xhfYjnEr üzerinden de destek alabilirsin. Hüseyin hocam müsait oldukça yardımcı oluyor. Daha önce bu forumda paylaşılan bazı uygulamalar da ciddi desteği vardır...
eyvallah hocam teşekkür ederim
-
Windows 10 için otomatik kurulum yapmak için kullanabileceğin bir autounattend.xml hazırlamak istiyorum. Kurulum sonrasında otomatik olarak google chrome enterprise, adobe reader , ve office 2021 retail online kurulmasını istiyorum
böyle bir xml hazırladım. Sizce hata alma şansım nedir?
önerileriniz var mı
aşağıda, kuruluş sırasında Google Chrome Enterprise, Adobe Reader, ve Office 2021 Retail Online uygulamalarını otomatik olarak kurmak için kullanabileceğiniz bir "autounattend.xml" dosyası örneği veriyorum:
<?xml version="1.0" encoding="utf-8"?>
<unattend xmlns="urn:schemas-microsoft-com:unattend">
<settings pass="specialize">
<component name="Microsoft-Windows-Shell-Setup" processorArchitecture="amd64" publicKeyToken="31bf3856ad364e35" language="neutral" versionScope="nonSxS" xmlns:wcm="http://schemas.microsoft.com/WMIConfig/2002/State" xmlns:xsi="http://www.w3.org/2001/XMLSchema-instance">
<AutoLogon>
<Password>
<Value>password</Value>
<PlainText>true</PlainText>
</Password>
<Username>username</Username>
<LogonCount>1</LogonCount>
<Enabled>true</Enabled>
</AutoLogon>
<ComputerName>MyComputer</ComputerName>
<TimeZone>Eastern Standard Time</TimeZone>
<RegisteredOrganization>MyCompany</RegisteredOrganization>
<RegisteredOwner>MyName</RegisteredOwner>
</component>
</settings>
<settings pass="oobeSystem">
<component name="Microsoft-Windows-Shell-Setup" processorArchitecture="amd64" publicKeyToken="31bf3856ad364e35" language="neutral" versionScope="nonSxS" xmlns:wcm="http://schemas.microsoft.com/WMIConfig/2002/State" xmlns:xsi="http://www.w3.org/2001/XMLSchema-instance">
<OOBE>
<HideEULAPage>true</HideEULAPage>
<NetworkLocation>Work</NetworkLocation>
<ProtectYourPC>3</ProtectYourPC>
</OOBE>
</component>
</settings>
<settings pass="generalize">
<component name="Microsoft-Windows-Security-SPP" processorArchitecture="amd64" publicKeyToken="31bf3856ad364e35" language="neutral" versionScope="nonSxS" xmlns:wcm="http://schemas.microsoft.com/WMIConfig/2002/State" xmlns:xsi="http://www.w3.org/2001/XMLSchema-instance">
<SkipRearm>1</SkipRearm>
</component>
</settings>
<settings pass="windowsPE">
<component name="Microsoft-Windows-International-Core" processorArchitecture="amd64" publicKeyToken="31bf3856ad364e35" language="neutral" versionScope="nonSxS" xmlns:wcm="http://schemas.microsoft.com/WMIConfig/2002/State" xmlns:xsi="http://www.w3.
buraya kadar olan "autounattend.xml" dosyası, kuruluş sırasında bilgisayarınızın adını, zaman dilimini, kayıtlı kuruluş ve sahibini ayarlayan bir cevaplama dosyasıdır. Aşağıdaki kodları ekleyerek, Google Chrome Enterprise, Adobe Reader, ve Office 2021 Retail Online uygulamalarını otomatik olarak kurabileceksiniz:
<settings pass="specialize">
<component name="Microsoft-Windows-Shell-Setup" processorArchitecture="amd64" publicKeyToken="31bf3856ad364e35" language="neutral" versionScope="nonSxS" xmlns:wcm="http://schemas.microsoft.com/WMIConfig/2002/State" xmlns:xsi="http://www.w3.org/2001/XMLSchema-instance">
<AutoLogon>
<Password>
<Value>password</Value>
<PlainText>true</PlainText>
</Password>
<Username>username</Username>
<LogonCount>1</LogonCount>
<Enabled>true</Enabled>
</AutoLogon>
<ComputerName>MyComputer</ComputerName>
<TimeZone>Eastern Standard Time</TimeZone>
<RegisteredOrganization>MyCompany</RegisteredOrganization>
<RegisteredOwner>MyName</RegisteredOwner>
<Packages>
<Package wcm:action="add">
<Path>path\to\GoogleChromeEnterprise.msi</Path>
<Arguments>/qn</Arguments>
</Package>
<Package wcm:action="add">
<Path>path\to\AdobeReader.msi</Path>
<Arguments>/qn</Arguments>
</Package>
<Package wcm:action="add">
<Path>path\to\Office2021RetailOnline.msi</Path>
<Arguments>/qn</Arguments>
</Package>
</Packages>
</component>
</settings>
Bu örnekte, "path\to\GoogleChromeEnterprise.msi", "path\to\AdobeReader.msi", ve "path\to\Office2021RetailOnline.msi" yolu, sisteminizde bu uygulamaların yer aldığı klasörlerin yolunu gösterir. "Arguments" parametresinde verilen "/qn" seçeneği, kuruluş sırasında kullanıcıdan hiçbir bilgi istememesi için kullanılır
Bu örnekte arguments klasörü nerede olmalı?
"arguments" klasörü, "autounattend.xml" dosyasında yer alan "Packages" bölümünde bir alt bölümdür. "Packages" bölümü, kuruluş sırasında yüklemek istediğiniz uygulamaları belirtir. "Arguments" bölümü ise, bu uygulamaların kuruluş sırasında nasıl kurulacağını belirtir. Örneğin, aşağıdaki kod parçasında, "GoogleChromeEnterprise.msi" dosyasının kuruluş sırasında hiçbir bilgi istememesi için "/qn" seçeneği kullanılmıştır:
<Package wcm:action="add">
<Path>path\to\GoogleChromeEnterprise.msi</Path>
<Arguments>/qn</Arguments>
</Package>
Bu örnekte, "arguments" klasörü, "Packages" bölümünün altında yer almaktadır. Eğer "autounattend.xml" dosyasını oluştururken "Packages" bölümünü kullanmak isterseniz, "arguments" klasörünü de bu bölümün altında ekleyin.
Google chrome vb. Programları doğrudan internetten indirmesi ve kurulmasını nasıl sağlayabiliriz?
Packages" bölümünün altına aşağıdaki kod parçasını ekleyin:
<Package wcm:action="add"
installCommand="/qn /norestart /Chrome /Chrome-bin"
name="Google Chrome"
packageName="GoogleChromeStandaloneEnterprise.msi"
sourceFile="http://www.example.com/downloads/GoogleChromeStandaloneEnterprise.msi"
/>
Bu kod parçası, "GoogleChromeStandaloneEnterprise.msi" dosyasını internetten indirerek kurulmasını sağlar."installCommand" parametresi, kuruluş sırasında kullanılacak olan komutları belirtir. Örnekte verilen "/qn /norestart /Chrome /Chrome-bin" seçenekleri, uygulamanın kuruluş sırasında hiçbir bilgi istememesi, sistem yeniden başlatılmaması, "Google Chrome" uygulamasının kurulacağı dizinin adının "Chrome" ve uygulamanın kuruluş dosyasının adının "Chrome-bin" olmasını belirtir.
"packageName" parametresi, indirilen uygulamanın dosya adını belirtir. "sourceFile" parametresi ise, internette indirilecek olan uygulamanın URL adresini gösterir. Örnekte verilen "http://www.example.com/downloads/GoogleChromeStandaloneEnterprise.msi" URL adresi, sadece bir örnektir ve gerçek bir URL adresi değildir. Gerçek bir URL adresi kullanarak, "Google Chrome" uygulamasını internetten indirip kurulmasını sağlayabilirsiniz.
Bu örnekte, "Packages" bölümüne eklenen bu kod parçası, internetten indirilerek kurulacak olan "Google Chrome" uygulamasını belirtir. Eğer başka bir uygulama indirip kurulmasını da istiyorsanız, aynı şekilde "Packages" bölümüne ekleyebilirsiniz.
Bu programların kurulumu sırasında bir kurulum arayüzü ekleyebilir miyiz, ilerleme ve kurulum süresini gösteren ve kurulum tamamlandı uyarısı vb.?
-
"Packages" bölümünün altına aşağıdaki kod parçasını ekleyin:
<Package wcm:action="add">
<Path>path\to\installer.exe</Path>
<Arguments>/s /v"/qn"</Arguments>
<UI>
<UIText>Please wait while the installation is in progress...</UIText>
<UIElement>Progress</UIElement>
</UI>
</Package>-
2
-
1
-
-
-
Windows 8.1 Professional VL Online
9NYWH-2MGKQ-9CC8H-4CH7F-FCYDQ
JVWPW-JNYQR-K78M2-T7DQW-VH4X3
7Q2NP-YWCTB-P3RT6-R3W48-YPYDQ
Windows 7 Professional OEM:COA online (phone)
39BYQ-RFTHJ-KF76D-GGYF4-VH69X
Windows 7 Home Premium OEM:NONSLP online (phone)
J92YG-WR76P-34RQK-YT2RH-RQXVT
Office 2013_ProPlusVL_MAK online
B9NHK-GQ2WK-DHBJC-KRMRW-PJ9KV
4BKNT-R7TX9-B2HXV-TVCJF-W8C9V
36KNF-496TJ-KG393-3HTV3-JTWQH
WDD9N-9XG26-VJ6RX-9897B-3GKKV
Office16_VisioProR_Retail online
GJ7D9-N7KW9-MV9WW-PKW89-DYH8H
Office16_AccessR_Retail online
6NXP8-XKPXX-XC733-KHGX4-PPQHF
Office21_VisioPro2021R_Retail phone
2RTNC-4CPFG-T3PYD-Q8J3T-6F7VP
Office21_ProjectPro2021R_Retail phone
YJ6J3-FNP99-RDQTV-HFV6H-BD2BV
![[IMG]](https://i.imgur.com/kg8kKZM.png)
![[IMG]](https://i.imgur.com/JIjrVbh.png)
-2023-01-31-03-14-46.png.2be07211ac674d7f6fdc32f78635fad0.png)
 Kullandığın ürün anahtarı engellenmiş. Malesefaktivasyon olmaz. Başka bir ürün anahtarı eklemelisin
Virüs Mü?
in Yazılım
Posted
Hasena kuranı kerim kurmuş galiba. Onu kaldırırken tam kaldırmamış yada virüslü, antivirüs sistem silmiş