

crasadure
-
Posts
2287 -
Joined
-
Last visited
-
Days Won
124
Content Type
Profiles
Forums
Calendar
Posts posted by crasadure
-
-
hammer1284, 21 dakika önce yazdı:
Yeni sürümde eklediğimiz sistemleri nereden görüyoruz bir de silme işlemi nasıl yapılıyor
Silme işlemi şu anda mevcut değil, manüel elle silmek gerekiyor ama sonraki sürümlerde bu özellik mutlaka eklenecektir diye düşünüyorum
-
Anhdv Boot 2023 v23.3 (February 3, 2023)
- Fix the error of not showing icons on some devices
- Improved Network recognition
- Fixes an issue where VMware Tool is not automatically installed on virtual machines and does not display the option to install VMware Tool on Driver Install tool (Premium only feature)
- Fix Turn Off Bitlocker, EasyBCD, AS SSD Benchmark
- Optimize the boot process when booting the whole ISO file (Ventoy, or virtual machine …)
- Support to run Keyboard Test V4 on portable hard drive or run WinPE from hard drive (note, click continue to use).
- Update some software to new version
Premium Download Links
-
 2
2
-
Download AIO_Boot_NewGen_Setup.exe Size 15.3 MB Version 23.02.15.00 Requirements Windows 7 and later SHA-1 0f8223512fb3643d1a5fef28d2316b7528a0502d Changelog
-
23.02.15:
- Add ISO: supports canceling processes in progress and in queues.
- Grub4dos for UEFI, the same way to add Clover and rEFInd. The way to add is in the changelog in the previous version.
- EFI/Active Partition: don’t mount partitions on other disks.
-
1
-
23.02.15:
-
forjest, 2 saat önce yazdı:
crasadure Yeni AIOBoot ile ilgili detaylı bir video çekebilirmisin değerli üstadım. Neler geldi gitti değişti yapımcısı neden güncelledi vs. son çıkan sürümle şaşkına çevirdi bizi. Saygılarımla.
")
Valla çekeriz de, forumdan tepki gelebilir diye çekiniyorum. Sonuçta milletçe YAS ta olduğumuz bir dönemde "sen kalkmış hiç bir şey olmamış gibi nasıl böyle video çekebiliyorsun hocam" diye haklı serzenişlerden çekiniyorum. Bunca acı var iken bu psikoloji durumunda farklı kişilerden farklı tepkiler almamak adına video çekimlerine ara verdim.
Ama forumdaki arkadaşlar video çekimine olumlu bakarlarsa elimden geldiğince,dilim döndüğünce anlatırım. Ama bir kişi bile istemezse o zaman video çekimi yapmam. Fikrine saygı duyarım o arkadaşımızın
-
5
-
 2
2
-
-
Download AIO_Boot_NewGen_Setup.exe Size 15.3 MB Version 23.02.13.00 Requirements Windows 7 and later SHA-1 fa2037495dfeb9d8ea570a9f0293d3a1fad4a574 Changelog
-
23.02.13:
-
Setup.exe:
-
New: Mark FAT32 as ESP/Active Partition
- This option is an informational, cannot be unchecked.
- For MBR, the FAT32 partition selected in the list will be marked as Active.
- For GPT, the FAT32 partition selected in the list will be marked as ESP (EFI System Partition).
- Show all FAT32 drives/partitions in the list. Previous versions only show the one it found first.
-
New: Mark FAT32 as ESP/Active Partition
-
New: Tools -> ESP/Active Partitions
- Mount All: this will mount the drive for all ESP/Active partitions it finds. For USB, no more than one partition is visible on versions of Windows prior to Windows 10 build 15063.
- Unmount All: This item unmounts.
- Explorer Dialog: this dialog helps to access, edit, add and delete files in the ESP partition.
-
rEFInd Boot Manager và Clover Bootloader:
- First, we need to mount the drive for the FAT32 partition, then from the Add ISO tab, select the FAT32 drive in the [Add To] section. If you do not know how to mount the drive for the FAT32 partition, use the Mount All function mentioned above.
- The download link is listed in the Download menu.
- Clover supports both EFI and Legacy. Supported extensions: .iso.7z.
- rEFInd only supports EFI. Supported filename: refind-bin-x.xx.x.x.zip.
-
Setup.exe:
-
23.02.13:
-
Download AIO_Boot_NewGen_Setup.exe Size 15.8 MB Version 23.02.10.00 Requirements Windows 7 and later SHA-1 7d025fdc730eb809e1c3fa23ca60f5b90fa1efd3 Changelog
- 23.02.10: Grub2 Background and Color: Removed unsupported colors, the list now includes only 16 colors.
-
1
-
Download AIO_Boot_NewGen_Setup.exe Size 15.8 MB Version 23.02.09.00 Requirements Windows 7 and later SHA-1 7e93c89469f49ed329efa1810914cc8caa776c2c Changelog
-
23.02.09:
-
New: Tools -> Grub2 Background and Color:
- The background image should be 1024×768.
- Click any blank area of the screen to select a Background image.
- Click on the texts to choose a color for them.
- For a Highlighted entry, click in an empty area on the line to choose a background color.
- Only 16 colors are supported in the [Custom colors] section, do not choose colors other than these.
- The colors displayed on the program are not the same as Grub2.
- Setup.exe: Fix failed to install if both partitions are mounted.
-
New: Tools -> Grub2 Background and Color:
-
23.02.09:
-
awejnhbow, 5 saat önce yazdı:
23.02.05 sürümünü indiriyor, linkteki dosya güncellenmemiş.
inen dosyanın sha-256 değeri: 99fd38dc5e105dfb77550eeb81f2b76dabb8c6850530dc6cdcdb43b8f6e32362
Haklısınız, yapımcıya bunu ilettim, dosyayı güncellemeyi unutmuş yapımcı. Bugün yarın düzeltir dosyayı. Dikkatimdem kaçmadı durum, kendisine rapor ettim
-
Download AIO_Boot_NewGen_Setup.exe Size 15.8 MB Version 23.02.07.00 Requirements Windows 7 and later SHA-1 341e1dbc3a92782286c4e1a725ab64486dbd2830 SHA-256 3d18ae62de5cec23c80c58a7695deb52c36e0739a3044ef30cd4155d52a330fa Changelog
-
23.02.07:
- NewGen.exe: New 64-bit version, running AIO_Boot_NewGen.cmd will automatically run the appropriate 32-bit or 64-bit version.(NewGen.exe: AIO_Boot_NewGen.cmd' yi çalıştıran yeni 64 bit sürüm, uygun 32 bit veya 64 bit sürümü otomatik olarak çalıştırır.)
- WinVHD tab & High DPI Settings (System, System (Enhanced)): fix display of elements.(WinVHD sekmesi ve Yüksek DPI Ayarları (Sistem, Sistem (Geliştirilmiş)): Bir önceki sürümde öğelerin görüntülenmesinde oluşan hata giderildi)
- Many bug fixes.(Birçok kodlama hatası giderildi)
-
1
-
23.02.07:
-
Ventoy u linux sistemlerde kullanmak isteyenler için .deb uzantılı debian tabanlı paketleri bir işletim sistemi yazılımcısı arkadaş tarafından her sürümü hazırlanmış.

https://os-builder.com/UETOYS/?C=M;O=D
Yukarıdaki linkten Ventoy un deb uzantılı paketlerini indirebilirsiniz.
Konu hakkında yapımcının Ventoy forumda paylaştığı bilgi aşağıdaki linkte mevcuttur.
-
Windows VHD (WinVHD Sekmesi)
The WinVHD tab helps to quickly create a VHD file and apply an edition in the Windows ISO file or WIM file to this VHD file.
By installing Windows into a VHD file, we do not need to create actual partitions on the disk, easily deploying, moving and removing the operating system as a file.
NewGen uses WimLib to Apply image in a WIM file to a VHD file.
Steps:
- Select the Windows installer ISO file, or open the ISO file, then select sources\install.wim or sources\install.esd. If the ISO file is selected, the tool will help select one of these files. In case you are using Windows 7, or the ISO file contains both x64 and x86 architectures, mount the ISO file and choose directly to the WIM/ESD file.
- Save VHD file to: only fixed NTFS drives are supported, not removable drives, USB…
-
Size:
- Specify the maximum allotable size for the VHD file, 20 GB minimum.
- The size is dynamically allocated, which means that the file size will increase with the size contained in the file until it reaches the maximum size.
- Boot Mode: This option holds a place for future features.
- Click the Create button to start creating.
Boot Sequence: Tools -> Windows Boot Manager -> Add a VHD file to the Boot Sequence.
From the BCDEdit /bootsequence description, I have added an option to boot to the VHD file on the next boot of Windows Boot Manager without having to show the entry every time it boots.
- After creating the VHD file, we should add it to the one-time boot sequence to start the Installation process.
- Once booted, the item in the list will be automatically deleted so we need to add it again to continue the Installation. Windows installation usually takes at least 2 boot times.
- Once the installation is complete, you can boot into the VHD file from the File Manager in Grub2.
-
WinVHD sekmesinde "CREATE" butonunu görünmeyen arkadaşlar için yapımcı test için bir dosya gönderdi.
Dosyayı mevcut dosya ile değiştirdikten sonra alt tarafta "Create" butonu gözüktü arkadaşlar. Bu sorunu yaşayanlar için; bu bir çözünürlük sorunu imiş.
Bu sorun bir sonraki versiyonda çözümlenmiş olacak. Bir sonraki versiyon yayınlanana kadar gereken işlemleri burada yayımlamak istedim.
(Açıklama :Sizde "Create" butonu gözüküyor ise bu işlemleri yapmanıza gerek yok..!)
1. Linkten AIO_Boot_NewGen.7z dosyasını indirin. Zip içinden çıkan AIO_Boot_NewGen.exe dosyasını flash diskinizdeki dosya ile değiştirin.
2. AIO_Boot_NewGen.exe dosyası üzerinde sağ click yapıp dosya özellikleri kısmından aşağıdaki ayarları yapınız.
Yukarıdaki işlemleri yaptığınızda "Create" butonu gözükecektir
-
WinPE11_10_8_Sergei_Strelec_x86_x64_2023.02.02_English
A small update in the form of a patch.
The patch applies to WinPE11_10_8_Sergei_Strelec_x86_x64_2023.01.30_EnglishFixed some bugs
Now if you use Dr.Web CureIt! and Kaspersky Virus Removal Tool
you must first run the Ramdisk shortcut, there in the Start menu
The brightness and color temperature of the monitor can be adjusted from the context menu of the Desktop
-
1
-
-
Download AIO_Boot_NewGen_Setup.exe Size 14.1 MB Version 23.02.05.01 Requirements Windows 7 and later SHA-1 36661a52ceeb83dfcc77faaf88bb7aab0c819aad SHA-256 99fd38dc5e105dfb77550eeb81f2b76dabb8c6850530dc6cdcdb43b8f6e32362
Changelog
-
23.02.05:
- WinVHD tab.
-
Boot Sequence:
- Tools -> Windows Boot Manager -> Add a VHD file to the Boot Sequence.
- Select a VHD file to boot on next boot.
- The VHD file will be booted by the current system’s Windows Boot Manager, not Grub2.
-
23.02.05:
-
mustafakarasan, 35 dakika önce yazdı:
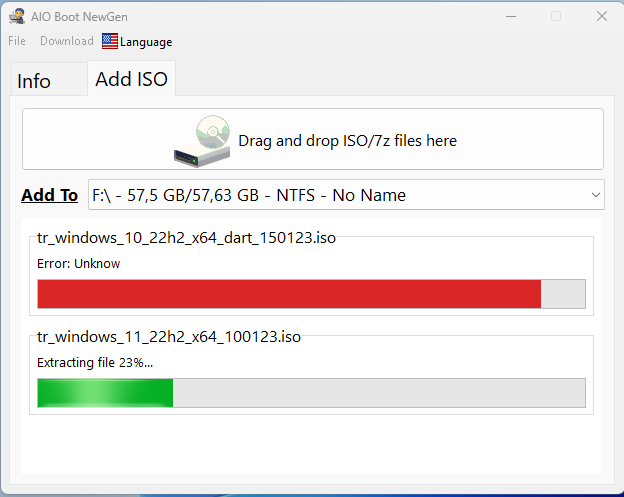
yanlış andım bilmiyorum fakat bu dart olayı ile ne alaka acaba anlayamadım.bir önceki sürümde yukarıda attığım resimdkei gibi aynı isoyu deniyorum sorun yok son sürümde hata veriyor.yeni sürümde bişeylerde hata var gibi geldi.bu dart dediğiniz olayı ne yapacağım çözemedim
Attığınız ve paylaştığınız resimde Hata veren dosya adı
tr_windows10_22h2_x64_dart_150123.iso
Şeklinde gözüküyor. Bir önceki sürümde test ettiğiniz ISO adi yine aynı.
Siz in sorun yaşadığınız dosya adından yola çıkarak bu ISO dosyasının Microsoft un Recovery ISO(Dart) su olduğunu düşünerek yapımcıya paylaştığınız resmi yolladim. Oda Dart ISO sunu test ettiğini ve entegrasyonda ve çalışmasında bir sorun olmadığını belirtti.
Bilgisayar başında değilim ve elimdeki cep telefonu ile sorunuza yardımcı olmaya çalıştım.
Konu hakkında daha fazla yardımcı olamayacağım.
https://www.aioboot.com/en/newgen/
Bu linkteki Join the Conversation kısmından yapımcıya sorunuzu yöneltin. Test ettiğiniz ISO 'nun indirme linkini kendisi ile paylaşmanız uygun olacaktır. Oda aynı iso test yapar ve geri dönüş yapar umarım.
İyi forumlar!
-
1
-
-
mustafakarasan, 44 dakika önce yazdı:
benden başka son sürümde hata alan varmı acaba
https://www.upload-4ever.com/c2wznpv784b8
Şu linkteki Dart İso dosyasını deneyin. Yapımcı bunu denedi ve sistemde çalıştığını dair resim attı.
-
mustafakarasan, 11 dakika önce yazdı:
yeni sürümü indirdim sıfırdan kurulum yaptım.önceki sürümde sorunsuz entegre ettiğim isolarda şimdi hata veriyor.sona doğru
Windows Dart ISO desteği olmayabilir. Yapımcıya kendi sitesinden bu durumu rapor edebilirsiniz
-
Changelog
-
23.01.31:
- Accepts drag and drop WIM files.(WIM dosyalarını sürükle-bırak ile entegre etmeyi destekler)
- Uses the wimlib to modify WIM files, which is faster, does not require mounting to a directory.(Klasörü bağlamaya gerek duymadan hızlı bir şekilde WIMLIB uygulamasını kullanarak WIM dosyalarını düzenlemeyi ve entegre etmeyi sağlar)
Download AIO_Boot_NewGen_Setup.exe Size 14 MB Version 23.01.31 Requirements Windows 7 and later SHA-1 70480cfc19c1f333e8b630c1065c97c5cc164904 SHA-256 4c8314521e4460f67d6d6c2ba740a07d48a7d86e7f02eb89561cef789b5e714a
What is wimlib?
wimlib is an open source, cross-platform library for creating, extracting, and modifying Windows Imaging (WIM) archives
wimlib, Windows Imaging (WIM) arşivlerini oluşturmak, ayıklamak ve değiştirmek için açık kaynak kodlu, platformlar arası bir uygulamadır.
Current release: wimlib-1.13.6 (released Sep 11, 2022)
-
23.01.31:
-
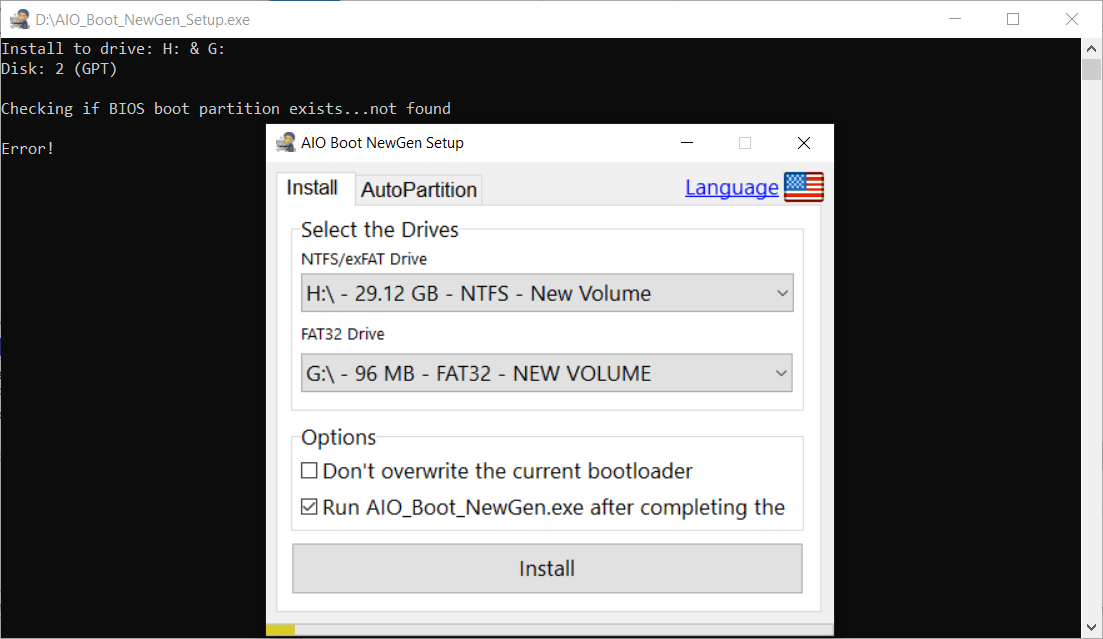
How to create a BIOS Boot Partition for GPT disk on Windows?
(Windows'ta GPT diski için BIOS Önyükleme Bölümü nasıl oluşturulur?)
Gpt disk yapısına sahip kullanıcıların Aioboot Newgen projesini flash disklerine yazdırır iken Grub2 nin kurulamamasi sorunu ile karşılaşmaları durumunda yapacakları iş ve işlemleri anlatan makale yazısı yapımcı tarafından paylaşılmış.
Eğer Autopartition kısmını kullanarak flash diski yapılandırmasını yaptıysanız bu şekilde bir problem ile karşılaşmazsınız. Diskin sonunda 1Mb bir alanı kendisi otomatik olarak oluşturmaktadır. Bu 1Mb lık alana Legacy modda çalışması için gereken core.img dosyası kurulmaktadır.
Eğer diskinizi kendiniz elle manuel bölmelendirme yapacaksanız, makaledeki hata ile karşılaşmanız durumunda bu sorunu çözmek için gereken işlem basamakları makalede anlatılmıştır.
-
1
-
-
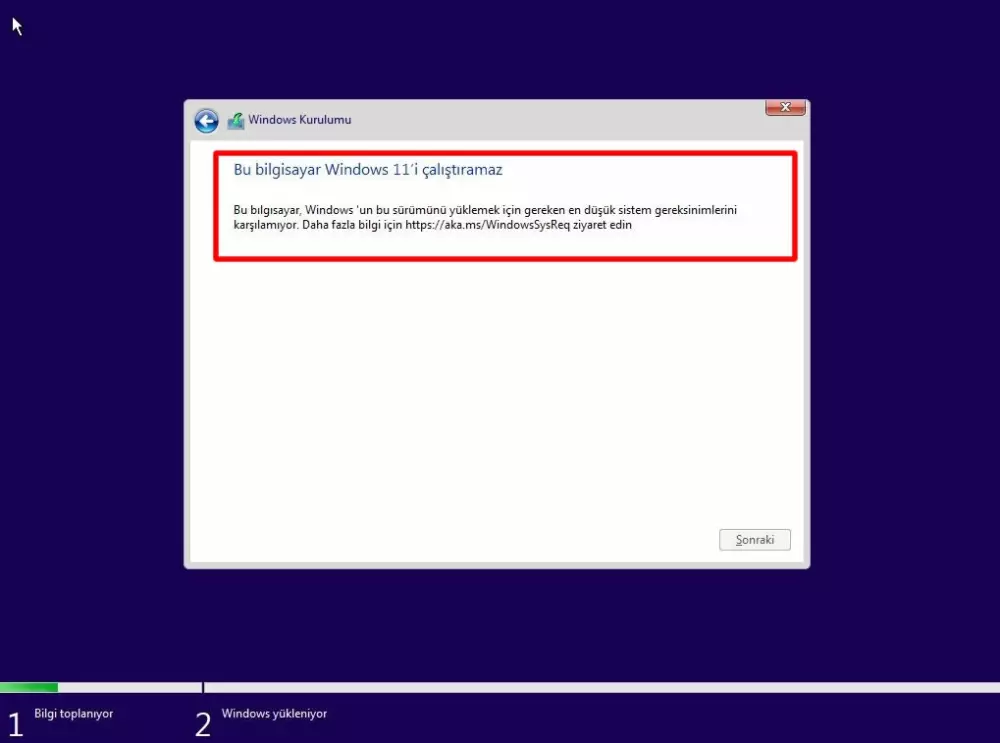
kamil1818, 1 saat önce yazdı:
merhabalar windows11 kurulumunda hata alıyorum bunun çözümü nedir
https://www.tnctr.com/topic/1033262-windows-11-tpm-hatasını-atlatmak-kalıcı-çözüm/
Yukarıdaki konu başlığına tıklayarak sorununuzu çözebilirsiniz. Yukarıdaki işlemleri yaptıktan sonra kurulum esnasında internet bağlantı kablosunu sökün, wi-fi ile bağlantı yapmayın. Kurulumu internet bağlantısı olmadan yapın
-
Download AIO_Boot_NewGen_Setup.exe Size 13.7 MB Version 23.01.27 SHA-1 7715ec316872e6d15ab8ed4ee72471c70c046986 SHA-256 dedd4233d91cd79a9b7537e34dddbddd3bac2a296195a7dc2eefbfd
Changelog
-
23.01.27:
- AutoPartition: format to NTFS instead of exFAT.
- (Autopartition kısmında varsayılan olarak; EXFAT dosya sistemi yerine NTFS dosya sistemi tercih edilmiştir.
-
WinPE & Setup:
- All entries will be stored in a single BCD file.(Tüm girdiler tek bir BCD dosyasında depolanmaktadır)
- Repackages the boot.wim file.(boot.wim dosyaları tekrardan paketlenmektedir)
- Supports ISO files created from Win10XPE.(Win10 PE şeklinde oluşturulan ISO PE sistemleri desteklemektedir)
- Autounattend.xml: The ISO files will be extracted to the \AIO\WinPE\xxxxx folder. Just copy the XML file into these folders for it to take effect(Autounattend.xml: ISO dosyaları \AIO\WinPE\XXX dizini altına entegre edilecektir. Otomatik kurulum için; kullanacağınız XML(Autounattend.xml)dosyasını bu klasör altına kopyalamanız yeterlidir.
-
1
-
23.01.27:
-
Redw0rm, 4 saat önce yazdı:
başka bir bilgisayarda taktığımda ventoy yüklendi kendi bilgisayarımda yüklenmeme sebebi ne olabilir ?
Flash belleğinize kurulum yapabildiğinize sevindim. Bilgisayarınızda buna ne engel olabilir bu konuda bir bilgim yok. Bunu sadece ihtimaller yada tahminlerde bulunabilirim.Ama onlarda sallamasyon tahminler olacaktır.
Mesela;
1. Acronics cyber protect
2. Malware antimalware
3. Deepfreeze gibi yazılımlar bazı işlemleri engelleyen yazılımlardır. Ama tabi bunlar dışında kullandığınız herhangi bir güvenlik yazılımı da bloke koyuyor olabilir.
Ben ventoy ile çalışır iken malware antimalware programını ve nod32 güvenlik yazılımını kapatarak işlem yapıyorum. İşim bittiğinde tekrar aktive ederim.
Sizin sorununuzun ne olduğu konusunda tahminde öteye gidemem. Bunu bulmak size düşüyor. Kolay gelsin 🙂👍
-
mustafakarasan, 59 dakika önce yazdı:
bununla entegrasyon güzel oluyor.peki diyelim bir acronis ekledik daha sonra silmek istedik nasıl sileceğiz acaba
Video55 in 18.dakika 45.saniyesinden itibaren buna değinmiştim(18'.45''). Video yu izlememişsiniz ki.
Sorunuzun cevabını, o dakika aralığında eleştirimi ve gerekliliğini de belirtmişim
-
Redw0rm, 35 dakika önce yazdı:
flaş bellekler 2 gün önce teknosa mağzasından aldım başka bir siteden veya farklı bi firmadan almadım daha önce aldığım flaşda ventoy yüklüydü şuan onada yükleyemiyorum aynı hatayla karşılaşıyorum.
Başka bir bilgisayarda flash belleginize ventoy u kurmayı deneyin. Başka bir bilgisayarda başarılı şekilde kuruluyor ise o zaman sorunun işletim sistemi yada bilgisayariniz ile alakalı olduğu ortaya çıkacaktır. Bunu deneme şansınız var mi?


AIO Boot Multiboot
in MultiBoot Sistemler
Posted
Windows Login Unlocker v1.6
Daha yeni sürümü ISO olarak internette bulamadım. Buda işe yarar sonuçta